Risk of Rain 2 Cant Hit Continue
| Mithrix | |
|---|---|
 | |
| King of Nothing | |
| Health | 1000 (+300 per level) |
| Damage | 16 (+3.2 per level) |
| Speed | 15 m/s |
| Armor | 20 (Plus Adaptive Armor) |
| Mithrix (4th Phase) | |
|---|---|
| | |
| King of Nothing | |
| Health | 1400 (+420 per level) |
| Damage | 3 (+0.6 per level) |
| Speed | 4 m/s |
| Armor | 20 |
Large domain located above the shattered breach of
Mithrix is the final boss of Risk of Rain 2. He is encountered at the apex of ![]() Commencement
Commencement ![]() Commencement (Final)
Commencement (Final)
Moon of Petrichor V
You dream of glass and dirt. ![]() Petrichor V's moon. It is made up of the shattered remains of four individual sections, emblematic of
Petrichor V's moon. It is made up of the shattered remains of four individual sections, emblematic of ![]() Mithrix
Mithrix  Mithrix
King of Nothing HP: 1000 (+300 per level)
Damage: 16 (+3.2 per level)
Class: Melee / Ranged
Speed: 15 m/s
Armor: 20 and Providence's tools of creation.![]() Petrichor V and final stage of the game.
Petrichor V and final stage of the game.
Environments
Description
Mithrix is an ancient, cyclopian humanoid with godlike powers, much of which he shared with his brother Providence. The growing philosophical opposition between the two siblings worsened to the point that Mithrix was banished to the shattered pieces of Large domain located above the shattered breach of ![]() Commencement
Commencement ![]() Commencement (Final)
Commencement (Final)
Moon of Petrichor V
You dream of glass and dirt. ![]() Petrichor V's moon. It is made up of the shattered remains of four individual sections, emblematic of
Petrichor V's moon. It is made up of the shattered remains of four individual sections, emblematic of ![]() Mithrix Mithrix
Mithrix Mithrix
King of Nothing HP: 1000 (+300 per level)
Damage: 16 (+3.2 per level)
Class: Melee / Ranged
Speed: 15 m/s
Armor: 20 and Providence's tools of creation.
By the time of the events of Risk of Rain 2, Providence had been slain, yet Mithrix's confinement upon Commencement as the King of Nothing continued. It would be the Survivors of the UES Safe Travels who reached the moon via the Primordial Teleporter to put an apparent end to him.
The deeper details and circumstances of Mithrix and Providence's relationship are detailed throughout many of the game's logs, most of which are taken from Mithrix's perspective, including those for Lose gold on taking damage equal to 100% (+100% per stack) of the maximum health percentage you lost.![]() Brittle Crown
Brittle Crown ![]()
![]() Brittle Crown
Brittle Crown
Gain gold on hit... BUT surrender gold on getting hit.
30% chance on hit to gain 2 (+2 per stack) gold. Scales over time. ![]() A Moment, Fractured
A Moment, Fractured ![]() A Moment, Fractured (Hidden Realm)
A Moment, Fractured (Hidden Realm)
Hidden Realm: A Moment, Fractured
Multiple floating islands in a void, with sharp blue crystals embedded in them. The Obelisk can be found on top of the last island. , ![]() Bulwark's Ambry
Bulwark's Ambry ![]() Bulwark's Ambry (Hidden Realm)
Bulwark's Ambry (Hidden Realm)
Hidden Realm: Bulwark's Ambry
The area consists of block-shaped platforms, with the Artifact Reliquary in the center. and more.
Skills & Encounter
Adaptive Armor
During phases 1 and 3 of the fight, Mithrix has the Adaptive Armor passive which protects him against bursts of damage. Every time Mithrix takes damage, he gains temporary armor equal to , or 30 armor per 1% of his max HP dealt. This armor caps at 400 and decays at a rate of 40 per second.
 , or 30 armor per 1% of his max HP dealt. This armor caps at 400 and decays at a rate of 40 per second.
 Unique Scaling
During the same phases he also has unique scaling, which scales his HP and damage drastically the longer it takes to reach the boss fight.
Boss Encounter
Phase 1
Mithrix starts the battle with basic attacks, running towards the player to get into melee range.
Dash
Mithrix periodically dashes a short distance to line up attacks better and fake out the player. This also removes all his debuffs.
Hammer Swing
Mithrix swipes with his hammer, dealing 200% damage. This attack moves him forwards a moderate amount.
This skill has a cooldown of 5 seconds.
Hammer Smash
Mithrix winds up and smashes the ground with his hammer, dealing 1200% damage on a direct hit and creating an explosion that deals 1200% damage (with sweet spot falloff).
This skill has a cooldown of 4 seconds.
Shock Wave
After taking enough damage, Mithrix leaps high into the air. After a few seconds, he slams down in the center of the arena, creating a ring-shaped shock wave that deals 400% damage and applies ![]() Cripple
Cripple  Cripple (Debuff)
Reduces armor by 20. Reduces movement speed by 50%. . The shock wave ends when it reaches the thin line of rocks between the platform where he is first seen.
Mithrix gains ![]() Armor Boost
Armor Boost  Armor Boost (Buff)
Gain additional armor. Gain +200 armor. while jumping and landing, and ![]() Hidden Invincibility
Hidden Invincibility  Hidden Invincibility (Buff)
Become invulnerable. Become immune to all attacks. while in the air. This skill has a cooldown of 30 seconds.
Needle Barrage
After landing from the Shock Wave attack, Mithrix runs towards the player and fires up to 12 needles, dealing 60% damage each.
This skill has a cooldown of 6 seconds, which begins after the first needle is fired.
Phase 2
Mithrix leaves the arena, and several stone pillars rise up around the arena. In place of Mithrix himself, several ![]() Lunar Chimera Golems
Lunar Chimera Golems  Lunar Chimera (Golem)
Zenith Designs HP: 1615 (+485 per level)
Damage: 35 (+7 per level)
Class: Ranged
Speed: 8 m/s
Armor: 0 , ![]() Lunar Chimera Wisps
Lunar Chimera Wisps  Lunar Chimera (Wisp)
Zenith Designs HP: 850 (+255 per level)
Damage: 15 (+3 per level)
Class: Ranged
Speed: 18 m/s
Armor: 0 , and ![]() Lunar Chimera Exploders
Lunar Chimera Exploders  Lunar Chimera (Exploder)
Zenith Designs HP: 180 (+54 per level)
Damage: 11 (+2.2 per level)
Class: Ranged / Self-Destruct
Speed: 8 m/s
Armor: 0 are summoned and must be defeated. If 4 pillars on Commencement were not activated and the player got to the arena through movement abilities and items, chimeras will occasionally be summoned even as the phase continues. Otherwise, no new chimeras will be spawned.
Phase 3
Mithrix returns with more powerful and different attacks, occasionally summoning Lunar Chimera Golems, Lunar Chimera Exploders, and more rarely, Lunar Chimera Wisps. He also becomes much more aggressive, attacking more frequently. His moveset is mostly identical to the first phase, but with some new attacks:
Lunar Hammer Smash
In addition to the direct damage and explosion, Mithrix's hammer slam now sends 3 small shock waves forward, dealing 200% damage and inflicting Cripple. It also leaves a lingering pillar of blue flame that deals 150% damage per tick.
Big Spinny
After Mithrix performs his Shock Wave leap, instead of shooting needles, he summons rotating radial lines of flame around himself. These explode after short delay, dealing 900% damage and inflicting Cripple. This occurs 5 times in a row, with varying speed and direction of the flames' spin.
Phase 4
Mithrix steals all players' items and gains their buffs, except for equipment, When the Tonic wears off, you have a 20% chance to gain a Tonic Affliction, reducing all of your stats by -5% (-5% per stack).![]() Tonic Afflictions
Tonic Afflictions ![]()
![]() 60s Spinel Tonic
60s Spinel Tonic
Gain a massive boost to ALL stats. Chance to gain an affliction that reduces ALL stats.
Drink the Tonic, gaining a boost for 20 seconds. Increases damage by +100%. Increases attack speed by +70%. Increases armor by +20. Increases maximum health by +50%. Increases passive health regeneration by +300%. Increases movespeed by +30%.![]() Halcyon Seeds
Halcyon Seeds ![]()
![]() Halcyon Seed
Halcyon Seed
Summon Aurelionite during the Teleporter event.
Summon Aurelionite during the teleporter event. It has 100% (+50% per stack) damage and 100% (+100% per stack) health. , or ![]() Heresy Items
Heresy Items  Heretic The Heretic is a powerful character who can only be accessed through extraordinary means.
Class: Ranged
HP: 440 (+132 per level)
Damage: 18 (+3.6 per level)
Umbra: Unorthodoxy Risen . Damaging him will release the items, one by one in the order they were obtained. In multiplayer, the items will be returned to players in round robin order, by player slot. Mithrix moves much slower than in the previous phases, slowly stomping around the arena and using exclusively ranged attacks. While his base damage is also weaker, the use of the stolen items can cause devastation. His HP is governed by a different formula and since he no longer has unique scaling, his max HP will be significantly lower. Hitting him with sufficiently strong attacks will also stagger him. If the player has any Halcyon Seeds, ![]() Aurelionite
Aurelionite  Aurelionite
Titanic Goldweaver HP: 2100 (+630 per level)
Damage: 40 (+8 per level)
Class: Melee / Ranged
Speed: 5 m/s
Armor: 20 will spawn and help the player during this phase.
The stealing of the player's items can be skipped if Mithrix takes damage in the first frame of the phase. This is due to his invulnerability being applied after a short window, and not being present on spawn. This is most easily done with continuous damage, most notably a ![]() Kjaro's Band
Kjaro's Band ![]()
![]() Kjaro's Band
Kjaro's Band
High damage hits also blasts enemies with a runic flame tornado. Recharges over time.
Hits that deal more than 400% damage also blasts enemies with a runic flame tornado, dealing 300% (+300% per stack) TOTAL damage over time. Recharges every 10 seconds. triggered in the center of the arena (which may occur when Mithrix's phase 3 is finished after his jump slam). This will leave Mithrix with no items, and the player with all of their items, resulting in a quick completion of this phase.
There is a bug in which Mithrix will give the player Tonic Afflictions without either of them previously having any.
Needle Burst
Similar to his needle attack in phase 1.
Lunar Orbs
When Mithrix's health is sufficiently low, he kneels and pounds the ground, creating a ring of orbs 8 around himself that spirals outwards quickly, dealing 400% damage each. He also deals 8% of his current health in damage to himself.
Aftermath
Once Mithrix is defeated, all stolen items are returned and the moon begins a detonation sequence with an on-screen countdown. In order to exit Mithrix's arena, the surviving players must jump into one of the floating portals in order to teleport out. The players have 3 minutes to get to the Rescue Ship and complete its holdout event in order to escape, which requires the players to protect the ship by staying near it for 1 minute. Lines of flames will appear all across the map, similar to the columns used by some of Mithrix's attacks. ![]() Void Reavers
Void Reavers  Void Reaver
HP: 1900 (+570 per level)
Damage: 12 (+2.4 per level)
Class: Ranged / Self-Destruct
Speed: 6 m/s
Armor: 0 and ![]() Lunar Chimera (Wisp)
Lunar Chimera (Wisp)
Zenith Designs HP: 850 (+255 per level)
Damage: 15 (+3 per level)
Class: Ranged
Speed: 18 m/s
Armor: 0 ![]() Lunar Chimera (Exploder)
Lunar Chimera (Exploder)
Zenith Designs HP: 180 (+54 per level)
Damage: 11 (+2.2 per level)
Class: Ranged / Self-Destruct
Speed: 8 m/s
Armor: 0 ![]() Chimeras Lunar Chimera (Golem)
Chimeras Lunar Chimera (Golem)
Zenith Designs HP: 1615 (+485 per level)
Damage: 35 (+7 per level)
Class: Ranged
Speed: 8 m/s
Armor: 0 will spawn and attack the player, but they generally won't enter the protection zone of the Rescue Ship.
Successfully making it to the shuttle will complete the Washed Away challenge and unlock the ![]() Captain
Captain  Captain The Captain is a unique survivor that can control the battlefield with utility and damage - with help from the UES Safe Travels.
Class: Ranged
HP: 110 (+33 per level)
Damage: 12 (+2.4 per level)
Umbra: Tired Veteran as a playable Survivor. Additionally, on ![]() Monsoon difficulty, it will complete the The Calm challenge and unlock
Monsoon difficulty, it will complete the The Calm challenge and unlock ![]() Purity
Purity ![]()
![]() Purity
Purity
Reduce your skill cooldowns by 2 seconds. You are unlucky.
All skill cooldowns are reduced by 2 (+1 per stack) seconds. All random effects are rolled +1 (+1 per stack) times for an unfavorable outcome. , and unlocks the mastery skin for each player's current Survivor.
Arena Escape Portals

5 out of the 12 escape portals will randomly spawn, each with their own predefined teleport destination. They all rotate either clockwise or anticlockwise around the center of the arena at fixed radii lengths and heights. To identify them correctly, look for a big giant rock floating outside the arena and turn 180°. With your back against the reference point, the image below shows all the portals at the initial position they spawn and the direction they travel.
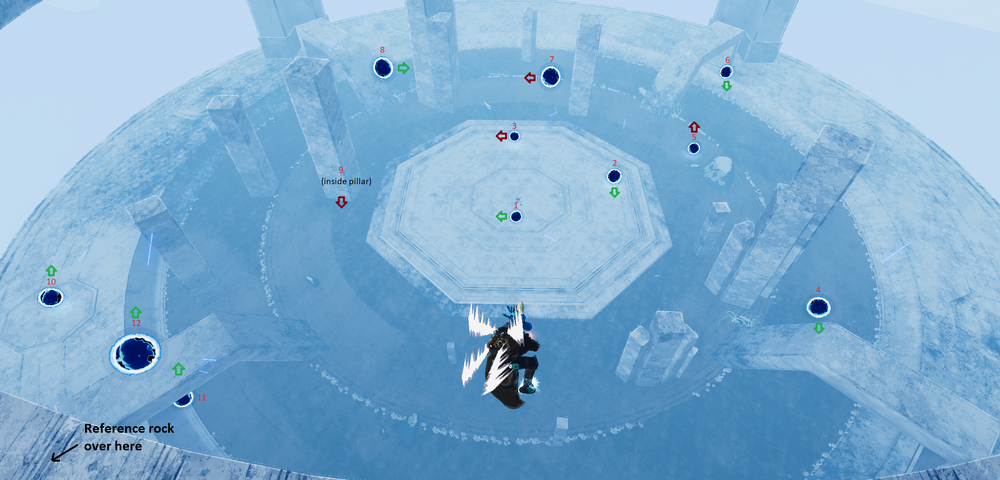
The teleport location and distance from the dropship for each escape portal is:
- On the bridge between the two Pillars of Design islands, 883.3 m away.
- In the middle of the Pillars of Blood area, 994.4 m away.
- On the far top floor of the Pillars of Soul area, 567.3 m away.
- On the back right of the Pillars of Blood area, 1022.9 m away.
- On the Cauldron island, 863.4 m away.
- On the Cauldron island near the chains towards the Pillars of Mass, 763.8 m away.
- On the ground floor or the Pillars of Soul area, 472.7 m away.
- On the Pillars of Design area, close to the center pillar leading to Mithrix, 736.3 m away.
- On the Pillars of Design area without the cauldrons, 874.2 m away.
- On the Pillars of Design area, very close to the center pillar leading to Mithrix, 721.1 m away.
- On the back left of the Pillars of Blood area, 1109.2 m away.
- On the far back of the Pillars of Blood area, 1058.8 m away.
Tips
- Mithrix cannot climb the pillars that appear on Phase 2, so if the player gets on top of them and uses ranged attacks, Phase 3 and 4 will be very easy. The ranged attack on Phases 3 and 4 can be easily dodged from higher ground as well. HOWEVER, the lines of flame in Phase 3 can still hit the player.
-
 Artificer's
  Artificer The Artificer is a high burst damage survivor who excels in fighting large groups and bosses alike.
Class: Ranged
HP: 110 (+33 per level)
Damage: 12 (+2.4 per level)
Umbra: Herald of the House Beyond Snapfreeze
  Snapfreeze (Utility) Freezing. Create a barrier that hurts enemies for 100% damage.
Survivor: Artificer and Cast Nano-Spear
  Cast Nano-Spear (Secondary) Freezing. Charge up a piercing nano-spear that deals 400%-1200% damage.
Survivor: Artificer skills are capable of freezing and executing Mithrix, unlike other bosses. - On-kill items, such as
 Topaz Brooch
 Topaz Brooch
Gain a temporary barrier on kill.
Gain a temporary barrier on kill for 15 health (+15 per stack). and Will-o'-the-wisp
 Will-o'-the-wisp
Detonate enemies on kill.
On killing an enemy, spawn a lava pillar in a 12m (+2.4m per stack) radius for 350% (+280% per stack) base damage. , are almost useless for Mithrix, as they will not activate unless he kills a player or ally. - Mithrix will take but cannot use
 Tougher Times
  Tougher Times
Chance to block incoming damage.
15% (+15% per stack) chance to block incoming damage. Unaffected by luck. , Razorwire
  Razorwire
Retaliate in a burst of razors on taking damage.
Getting hit causes you to explode in a burst of razors, dealing 160% damage. Hits up to 5 (+2 per stack) targets in a 25m (+10m per stack) radius , and Mired Urns
 Mired Urn
Siphon health from nearby enemies while in combat.
While in combat, the nearest 1 (+1 per stack) enemies to you within 13m will be 'tethered' to you, dealing 100% damage per second, applying tar, and healing you for 100% of the damage dealt. during Phase 4. - Mithrix will take

 Survivors of the Void - DLC Content
Lost Seer's Lenses is part of the Survivors of the Void DLC. It is only available if the DLC is enabled when starting a run.
Click for more info. Lost Seer's Lenses
 Survivors of the Void - DLC Content
This content is part of the Survivors of the Void DLC. It is only available if the DLC is enabled when starting a run.
Click for more info. Lost Seer's Lenses
Gain a 0.5% chance to instantly kill a non-boss enemy. Corrupts all Lens-Maker's Glasses.
Your attacks have a 0.5% (+0.5% per stack) chance to instantly kill a non-Boss enemy. Corrupts all Lens-Maker's Glasses. during Phase 4, but cannot use them against players.- He can still use them against drones.
- If Mithrix takes a
 Purity
 Purity
Reduce your skill cooldowns by 2 seconds. You are unlucky.
All skill cooldowns are reduced by 2 (+1 per stack) seconds. All random effects are rolled +1 (+1 per stack) times for an unfavorable outcome. in Phase 4, he will almost constantly fire projectiles. - Mithrix will take and use the Captain's
 Defensive Microbots
 Defensive Microbots
Shoot down nearby projectiles. Recharge rate scales with attack speed.
Shoot down 1 (+1 per stack) projectiles within 20m every 0.5 seconds. Recharge rate scales with attack speed. as well as any Medkits
  Medkit
Receive a delayed heal after taking damage.
2 seconds after getting hurt, heal for 20 plus an additional 5% (+5% per stack) of maximum health. during Phase 4, making the fight significantly harder until they are recovered. - Mithrix will take
 Dio's Best Friend
  Dio's Best Friend
Cheat death. Consumed on use.
Upon death, this item will be consumed and you will return to life with 3 seconds of invulnerability. during Phase 4, and he will use it if given the chance. However, players will regain an unspent Dio's Best Friend along with all other stolen items upon Mithrix's first death. If Dio's Best Friend is recovered before Mithrix dies, he won't gain a second life. - When the
 Artifact of Swarms is enabled, two Mithrix will spawn. Players must kill both bosses before they will advance from one phase to the next. However, when one's health is emptied, it will be incapacitated until the next phase.
 - This is especially dangerous if both Mithrix use their fire wheel attack at once, making it exceedingly difficult to dodge.
- As with other enemies, if the one Mithrix hits the other while
 Artifact of Chaos is active, they will begin to attack each other. This is highly likely to happen during his stomp attack, and makes the fight significantly easier.
- Mithrix steals items from minions, like
 Engineer's
  Engineer The Engineer is a unique class that requires planning and positioning to be successful.
Class: Ranged
HP: 130 (+39 per level)
Damage: 14 (+2.8 per level)
Umbra: Fortification Expert turrets, but does not use them. - During Phase 4, Mithrix will not use his orb attack while his health is above a certain threshold.
- During Phase 4, the
 Solus Probes
  Solus Probe
HP: 220 (+66 per level)
Damage: 15 (+3 per level)
Class: Ranged
Speed: 10 m/s
Armor: 10 spawned from Empathy Cores
  Empathy Cores
Recruit a pair of Solus Probes that gain power with more allies.
Every 30 seconds, summon two Solus Probes that gain +100% (+100% per stack) damage per ally on your team. remain with the player and deal significant damage to Mithrix, making the phase noticeably easier. -
 Captain's Captain The Captain is a unique survivor that can control the battlefield with utility and damage - with help from the UES Safe Travels.
Class: Ranged
HP: 110 (+33 per level)
Damage: 12 (+2.4 per level)
Umbra: Tired Veteran OGM-72 'DIABLO' Strike
  OGM-72 'DIABLO' Strike (Utility) Stunning. Request a kinetic strike from the UES Safe Travels. After 20 seconds, it deals 40,000% damage to ALL characters.
Survivor: Captain can be used to effectively and reliably one-shot, or at the very least, severely damage Mithrix. However, this requires exact timing, and the player should ideally have high stacks of Crowbars
  Crowbar
Deal bonus damage to enemies above 90% health.
Deal +75% (+75% per stack) damage to enemies above 90% health. , Runald's Bands
  Runald's Band
High damage hits also blasts enemies with runic ice. Recharges over time.
Hits that deal more than 400% damage also blasts enemies with a runic ice blast, slowing them by 80% for 3s (+3s per stack) and dealing 250% (+250% per stack) TOTAL damage. Recharges every 10 seconds. , and/or Shaped Glass
  Shaped Glass
Double your damage... BUT halve your health.
Increase base damage by 100% (+100% per stack). Reduce maximum health by 50% (+50% per stack). . When first entering the arena, place the DIABLO Strike in the center of the arena. When the cooldown timer reaches 29 seconds, run to the center of the arena and initiate the fight. During Phase 2, leave 1 enemy alive (avoid any offensive drones or minion items for this to work), then place a DIABLO Strike in the center of the arena. Wait until the cooldown timer reaches 28 seconds and kill the last enemy. If the player has Kjaro's Band
  Kjaro's Band
High damage hits also blasts enemies with a runic flame tornado. Recharges over time.
Hits that deal more than 400% damage also blasts enemies with a runic flame tornado, dealing 300% (+300% per stack) TOTAL damage over time. Recharges every 10 seconds. , it will also instantly kill Mithrix when he begins Phase 4.
Lore
They knew to stay away from the wells - but they were just kids. And they just wanted to know. They threw in dirt and stone and kifruit and starseed, watching as they collapsed. Thorp! The gravity wells would swallow up anything. Glass and mud and silver. Wind. Heat. Pulsar radiation. And when his brother wasn't watching, Mithrix would throw in worms. Thorp! But only when he wasn't watching. You see, his brother loved worms. It would make him sad. But Mithrix didn't care much about worms. He was just curious. But one time, his brother was watching. And his brother loved worms.
Version History
- Survivors of the Void
- (Undocumented) Health: 1400 (+420 per level) ⇒ 1000 (+300 per level)
- PS4 & Xbox One Patch
- Bug Fixes
- PC Patch v1.1.1.2
- Bug Fixes
- Fixed a crash during the last boss fight
- Anniversary Update
- Gameplay Changes
- Base Health: 1000 (+300 per level) ⇒ 1400 (+420 per level)
- Added stagger state triggered by taking high damage
- Item Steal
- Now consistently returns items as you deal damage, rather than randomly, i.e if you have him at 50% health, you will have 50% of your items back
- Now consistently returns items to players in multiplayer in order (1, 2, 3, 4, 1, 2, 3, 4) rather than per-player damage
- Now returns items in the order that you found them, rather than in reverse order
- Now utilizes Crowbars Crowbar
Deal bonus damage to enemies above 90% health.
Deal +75% (+75% per stack) damage to enemies above 90% health.
- Bug Fixes
- Fixed the final boss's crystals not being correctly colored
- PC Patch v1.0.2.0
- Bug Fixes
- Fixed the final boss' shockwaves being fired an extra time for each remote client in the game
- PC Patch v1.0.1.1 (Build ID No.5440050)
- Gameplay Changes
- Bug Fixes
- Fix Final Boss health bar not showing for clients (including phase 2)
- Fix final boss fight sometimes not triggering
- Early Access Content Update 5
- Major Content
- Added New Final Boss: ???
- Added New Monster Lore Entry: ???
Dialogue
Mithrix is unique in that he speaks throughout his fight, with his quotes appearing in the chat box. His dialogue may change depending on what items the player holds or which character they are playing as.
Toggle Dialogue
Spawning
- Pray.
- Beg.
- Die.
- Be slaughtered.
Spawning (when the Player is the Heretic)
- Regret this journey, Heretic.
- Die again, Heretic.
Dealing damage (early phases)
- Bleed.
- Now is the time for fear.
- Weak.
- Frail - and soft.
- You are nothing.
- Mistake.
- Scream, vermin.
- Break beneath me.
- Slow.
- Your body will shatter.
Dealing damage (final phase)
- BLEED.
- SCREAM.
- WHERE'S YOUR INFLUENCE?
- FLEETING STRENGTH.
- FRAIL.
- BREAK.
- FALSE STRENGTH.
- DRAIN.
- DIE, VERMIN.
- WEAK, WITHOUT YOUR BAUBLES AND TRINKETS.
Player is killed (early phases)
- Return to dirt.
- Submit, vermin.
- Die, vermin.
- Die, weakling.
- Become memories.
Player is killed (final phase)
- DIE.
- WEAK.
- USELESS.
- AS I THOUGHT...
- VERMIN.
Player is killed as Heretic (early phases)
- Return to pieces, Heretic.
- Die again, Heretic.
Player is killed as Heretic (final phase)
- RETURN TO PIECES, HERETIC.
- DIE AGAIN, HERETIC.
The Player has Halcyon Seed (final phase)
- THE GUARDIAN...? IMPOSSIBLE...!
- THE WRETCHED GUARDIAN!
The Player has Halcyon Seed and Aurelionite is killed
- YOU CANNOT DEFY ME, GUARDIAN.
- RETURN TO DIRT, GUARDIAN.
The Player has Halcyon Seed and is also the Heretic (final phase)
- THE HERETIC? THE GUARDIAN? HOW? WHO PULLS YOUR STRINGS, VERMIN?
Mithrix kills a drone
- Inferior construct. Broken.
- Primitive scrap.
- Disassembled.
Mithrix is killed
- NO... NOT NOW...
- WHY... WHY NOW...?
- NO... NO...!
- BROTHER... HELP ME...!
- THIS PLANE GROWS DARK... BROTHER... I CANNOT SEE YOU... WHERE ARE YOU...?
- BROTHER... PERHAPS... WE WILL GET IT RIGHT... NEXT TIME...
| Monsters |
|---|
| Normal |
 Alloy Vulture Alloy Vulture HP: 140 (+42 per level) Damage: 15 (+3 per level) Class: Ranged Speed: 3 m/s Armor: 0 • Alpha Construct is part of the Survivors of the Void DLC. It is only available if the DLC is enabled when starting a run. Click for more info.  This content is part of the Survivors of the Void DLC. It is only available if the DLC is enabled when starting a run. Click for more info. Alpha Construct HP: 100 (+30 per level) Damage: 12 (+2.4 per level) Class: Ranged Speed: 0 m/s Armor: 0 •  Beetle Beetle HP: 80 (+24 per level) Damage: 12 (+2.4 per level) Class: Melee Speed: 6 m/s Armor: 0 •  Beetle Guard Beetle Guard HP: 480 (+144 per level) Damage: 12 (+2.4 per level) Class: Melee / Ranged Speed: 17 m/s Armor: 0 •  Bighorn Bison Bighorn Bison HP: 480 (+144 per level) Damage: 12 (+2.4 per level) Class: Melee Speed: 3 m/s Armor: 0 • Blind Pest is part of the Survivors of the Void DLC. It is only available if the DLC is enabled when starting a run. Click for more info.  This content is part of the Survivors of the Void DLC. It is only available if the DLC is enabled when starting a run. Click for more info. Blind Pest HP: 80 (+24 per level) Damage: 15 (+3 per level) Class: Ranged Speed: 6 m/s Armor: 0 • Blind Vermin is part of the Survivors of the Void DLC. It is only available if the DLC is enabled when starting a run. Click for more info.  This content is part of the Survivors of the Void DLC. It is only available if the DLC is enabled when starting a run. Click for more info. Blind Vermin HP: 90 (+27 per level) Damage: 15 (+3 per level) Class: Melee Speed: 13 m/s Armor: 0 •  Brass Contraption Brass Contraption HP: 300 (+90 per level) Damage: 10 (+2 per level) Class: Ranged Speed: 10 m/s Armor: 0 • Clay Apothecary is part of the Survivors of the Void DLC. It is only available if the DLC is enabled when starting a run. Click for more info.  This content is part of the Survivors of the Void DLC. It is only available if the DLC is enabled when starting a run. Click for more info. Clay Apothecary HP: 1050 (+315 per level) Damage: 20 (+4 per level) Class: Ranged Speed: 5 m/s Armor: 0 •  Clay Templar Clay Templar HP: 700 (+210 per level) Damage: 16 (+3.2 per level) Class: Ranged Speed: 6 m/s Armor: 0 •  Elder Lemurian Elder Lemurian HP: 900 (+270 per level) Damage: 16 (+3.2 per level) Class: Ranged Speed: 13 m/s Armor: 0 •  Greater Wisp Greater Wisp HP: 750 (+225 per level) Damage: 15 (+3 per level) Class: Ranged Speed: 7 m/s Armor: 0 • Gup is part of the Survivors of the Void DLC. It is only available if the DLC is enabled when starting a run. Click for more info.  This content is part of the Survivors of the Void DLC. It is only available if the DLC is enabled when starting a run. Click for more info. Gup HP: 1000 (+300 per level) Damage: 12 (+2.4 per level) Class: Melee Speed: 12 m/s Armor: 0 •  Hermit Crab Hermit Crab HP: 100 (+30 per level) Damage: 12 (+2.4 per level) Class: Ranged Speed: 10 m/s Armor: 0 •  Imp Imp HP: 140 (+42 per level) Damage: 10 (+2 per level) Class: Melee Speed: 10 m/s Armor: 0 •  Jellyfish Jellyfish HP: 60 (+18 per level) Damage: 5 (+1 per level) Class: Self-Destruct Speed: 10 m/s Armor: 0 • Larva is part of the Survivors of the Void DLC. It is only available if the DLC is enabled when starting a run. Click for more info.  This content is part of the Survivors of the Void DLC. It is only available if the DLC is enabled when starting a run. Click for more info. Larva HP: 45 (+14 per level) Damage: 11 (+2.2 per level) Class: Self-Destruct Speed: 1.5 m/s Armor: 0 •  Lemurian Lemurian HP: 80 (+24 per level) Damage: 12 (+2.4 per level) Class: Ranged / Melee Speed: 7 m/s Armor: 0 • Lunar Chimera (Exploder) Zenith Designs HP: 180 (+54 per level) Damage: 11 (+2.2 per level) Class: Ranged / Self-Destruct Speed: 8 m/s Armor: 0 • Lunar Chimera (Golem) Zenith Designs HP: 1615 (+485 per level) Damage: 35 (+7 per level) Class: Ranged Speed: 8 m/s Armor: 0 • Lunar Chimera (Wisp) Zenith Designs HP: 850 (+255 per level) Damage: 15 (+3 per level) Class: Ranged Speed: 18 m/s Armor: 0 •  Lesser Wisp Lesser Wisp HP: 35 (+10 per level) Damage: 3.5 (+0.7 per level) Class: Ranged Speed: 6 m/s Armor: 0 •  Mini Mushrum Mini Mushrum HP: 290 (+87 per level) Damage: 16 (+3.2 per level) Class: Ranged Speed: 2 m/s Armor: 0 •  Parent Parent HP: 585 (+176 per level) Damage: 16 (+3.2 per level) Class: Melee Speed: 11 m/s Armor: 0 • Solus Probe HP: 220 (+66 per level) Damage: 15 (+3 per level) Class: Ranged Speed: 10 m/s Armor: 10 •  Stone Golem Stone Golem HP: 480 (+144 per level) Damage: 20 (+4 per level) Class: Ranged / Melee Speed: 6.6 m/s Armor: 0 • Void Barnacle is part of the Survivors of the Void DLC. It is only available if the DLC is enabled when starting a run. Click for more info.  This content is part of the Survivors of the Void DLC. It is only available if the DLC is enabled when starting a run. Click for more info. Void Barnacle HP: 225 (+68 per level) Damage: 6 (+1.2 per level) Class: Ranged Speed: 0 m/s Armor: 0 • Void Infestor is part of the Survivors of the Void DLC. It is only available if the DLC is enabled when starting a run. Click for more info.  This content is part of the Survivors of the Void DLC. It is only available if the DLC is enabled when starting a run. Click for more info. Void Infestor HP: 45 (+14 per level) Damage: 11 (+2.2 per level) Class: Melee Speed: 14 m/s Armor: 0 • Void Jailer is part of the Survivors of the Void DLC. It is only available if the DLC is enabled when starting a run. Click for more info.  This content is part of the Survivors of the Void DLC. It is only available if the DLC is enabled when starting a run. Click for more info. Void Jailer HP: 2200 (+660 per level) Damage: 14 (+2.8 per level) Class: Ranged / Self-Destruct Speed: 7 m/s Armor: 0 • Void Reaver HP: 1900 (+570 per level) Damage: 12 (+2.4 per level) Class: Ranged / Self-Destruct Speed: 6 m/s Armor: 0 |
| Boss |
 Beetle Queen Beetle Queen Swarm Mother HP: 2100 (+630 per level) Damage: 25 (+5 per level) Class: Ranged Speed: 6 m/s Armor: 20 •  Clay Dunestrider Clay Dunestrider Ravenous Symbiont HP: 2100 (+630 per level) Damage: 25 (+5 per level) Class: Ranged Speed: 9 m/s Armor: 20 •  Grandparent Grandparent Aberrant Caretaker HP: 3625 (+1088 per level) Damage: 26 (+5.2 per level) Class: Ranged Speed: 0 m/s Armor: 20 •  Grovetender Grovetender Wisp Cultivator HP: 2800 (+840 per level) Damage: 23 (+4.6 per level) Class: Ranged Speed: 10 m/s Armor: 20 •  Imp Overlord Imp Overlord Lord of the Red Plane HP: 2800 (+840 per level) Damage: 16 (+3.2 per level) Class: Melee / Ranged Speed: 13 m/s Armor: 20 •  Magma Worm Magma Worm Ancient Lava Swimmer HP: 2400 (+720 per level) Damage: 10 (+2 per level) Class: Melee Speed: 20 m/s Armor: 15 •  Overloading Worm Overloading Worm The Reminder HP: 12000 (+3600 per level) Damage: 50 (+10 per level) Class: Melee Speed: 20 m/s Armor: 15 •  Scavenger Scavenger Item Hoarder HP: 3800 (+1140 per level) Damage: 4 (+0.8 per level) Class: Ranged Speed: 3 m/s Armor: 20 •  Solus Control Unit Solus Control Unit Corrupted AI HP: 2500 (+750 per level) Damage: 15 (+3 per level) Class: Ranged / Melee Speed: 7 m/s Armor: 20 •  Stone Titan Stone Titan Crisis Vanguard HP: 2100 (+630 per level) Damage: 40 (+8 per level) Class: Ranged / Melee Speed: 5 m/s Armor: 20 • Void Devastator is part of the Survivors of the Void DLC. It is only available if the DLC is enabled when starting a run. Click for more info.  This content is part of the Survivors of the Void DLC. It is only available if the DLC is enabled when starting a run. Click for more info. Void Devastator Destroyer of Worlds HP: 2800 (+840 per level) Damage: 12 (+2.4 per level) Class: Ranged / Self-Destruct Speed: 8 m/s Armor: 20 •  Wandering Vagrant Wandering Vagrant Gentle Protector HP: 2100 (+630 per level) Damage: 6.5 (+1.3 per level) Class: Ranged Speed: 6 m/s Armor: 15 • Xi Construct is part of the Survivors of the Void DLC. It is only available if the DLC is enabled when starting a run. Click for more info.  This content is part of the Survivors of the Void DLC. It is only available if the DLC is enabled when starting a run. Click for more info. Xi Construct Defense System HP: 2800 (+840 per level) Damage: 13 (+2.6 per level) Class: Ranged Speed: 60 m/s Armor: 15 |
| Special Boss |
 Alloy Worship Unit Alloy Worship Unit Friend of Vultures HP: 2500 (+750 per level) Damage: 15 (+3 per level) Class: Ranged Speed: 7 m/s Armor: 30 •  Artifact Reliquary Artifact Reliquary Stabilized HP: 100000 (+30000 per level) Damage: 10 (+2 per level) Class: Ranged Speed: 0 m/s Armor: 100000 • Aurelionite Titanic Goldweaver HP: 2100 (+630 per level) Damage: 40 (+8 per level) Class: Melee / Ranged Speed: 5 m/s Armor: 20 • Mithrix King of Nothing HP: 1000 (+300 per level) Damage: 16 (+3.2 per level) Class: Melee / Ranged Speed: 15 m/s Armor: 20 • Voidling is part of the Survivors of the Void DLC. It is only available if the DLC is enabled when starting a run. Click for more info.  This content is part of the Survivors of the Void DLC. It is only available if the DLC is enabled when starting a run. Click for more info. Voidling Diviner of the Deep HP: 2000 (+600 per level) Damage: 15 (+3 per level) Class: Ranged Speed: 45 m/s Armor: 20 |
| Risk of Rain 2 Wiki |
|---|
| Main |
| Artifacts • Challenges • Chests • Difficulty • Drones • Equipment • Interactables • Items • Item Stacking • Lore • Mechanics • Monsters • Newt Altars • Prismatic Trial • Shrines • Status Effects |
| Survivors |
 Acrid Acrid is a melee-range hybrid who uses powerful poisons to melt tanky enemies. Acrid Acrid is a melee-range hybrid who uses powerful poisons to melt tanky enemies.Class: Melee / Ranged HP: 160 (+48 per level) Damage: 15 (+3 per level) Umbra: Test Subject • Artificer The Artificer is a high burst damage survivor who excels in fighting large groups and bosses alike.Class: Ranged HP: 110 (+33 per level) Damage: 12 (+2.4 per level) Umbra: Herald of the House Beyond •  Bandit The Bandit is a high-skill combo character that can dish out devastating backstabs while weaving in and out of stealth. Bandit The Bandit is a high-skill combo character that can dish out devastating backstabs while weaving in and out of stealth.Class: Ranged HP: 110 (+33 per level) Damage: 12 (+2.4 per level) Umbra: Desperate Outlaw • Captain The Captain is a unique survivor that can control the battlefield with utility and damage - with help from the UES Safe Travels.Class: Ranged HP: 110 (+33 per level) Damage: 12 (+2.4 per level) Umbra: Tired Veteran •  Commando The Commando is a jack-of-all-trades character that is reliable in all situations of the game. Commando The Commando is a jack-of-all-trades character that is reliable in all situations of the game.Class: Ranged HP: 110 (+33 per level) Damage: 12 (+2.4 per level) Umbra: Cornered Gunslinger • Engineer The Engineer is a unique class that requires planning and positioning to be successful.Class: Ranged HP: 130 (+39 per level) Damage: 14 (+2.8 per level) Umbra: Fortification Expert • Heretic The Heretic is a powerful character who can only be accessed through extraordinary means.Class: Ranged HP: 440 (+132 per level) Damage: 18 (+3.6 per level) Umbra: Unorthodoxy Risen •  Huntress The Huntress is an extremely mobile but fragile survivor with a high damage output. Huntress The Huntress is an extremely mobile but fragile survivor with a high damage output.Class: Ranged HP: 90 (+27 per level) Damage: 12 (+2.4 per level) Umbra: Judge, Jury, Executioner •  Loader The Loader is a slow but powerful bruiser that can use her grappling hook to uniquely navigate the environment. Loader The Loader is a slow but powerful bruiser that can use her grappling hook to uniquely navigate the environment.Class: Melee HP: 160 (+48 per level) Damage: 12 (+2.4 per level) Umbra: Bionic Powerhouse •  Mercenary The Mercenary is a high skill melee survivor that uses his many dodges to weave in and out of combat. Mercenary The Mercenary is a high skill melee survivor that uses his many dodges to weave in and out of combat.Class: Melee HP: 110 (+33 per level) Damage: 12 (+2.4 per level) Umbra: Hired Blade •  MUL-T MUL-T is an aggressive survivor who has the tools necessary for any job! MUL-T MUL-T is an aggressive survivor who has the tools necessary for any job!Class: Melee / Ranged HP: 200 (+60 per level) Damage: 11 (+2.2 per level) Umbra: Right Tool for the Wrong Job • Railgunner is part of the Survivors of the Void DLC. It is only available if the DLC is enabled when starting a run. Click for more info.  This content is part of the Survivors of the Void DLC. It is only available if the DLC is enabled when starting a run. Click for more info. Railgunner The Railgunner is a long-range, single target survivor that can instantly kill any high priority target - and from any range. Class: Ranged HP: 110 (+33 per level) Damage: 12 (+2.4 per level) Umbra: Forgotten Nomad •  REX REX is a half robot / half plant that uses HP to cast devastating skills from a distance. The plant nor the robot could survive this planet alone – but thankfully they have each other. REX REX is a half robot / half plant that uses HP to cast devastating skills from a distance. The plant nor the robot could survive this planet alone – but thankfully they have each other.Class: Ranged HP: 130 (+39 per level) Damage: 12 (+2.4 per level) Umbra: Symbiotes • Void Fiend is part of the Survivors of the Void DLC. It is only available if the DLC is enabled when starting a run. Click for more info.  This content is part of the Survivors of the Void DLC. It is only available if the DLC is enabled when starting a run. Click for more info. Void Fiend The Void Fiend is a corrupted survivor that fluctuates between a controlled and corrupted form, each with different strengths and weaknesses. Managing this curse has become its fate. Class: Ranged HP: 110 (+33 per level) Damage: 12 (+2.4 per level) Umbra: Corrupted Amnesiac |
| Environments |
| Abandoned Aqueduct Origin of Tar You dream of sand beneath your feet. Massive skeletons and pools of tar are littered around, and a towering aqueduct pouring down tar dominates the area. • Abyssal DepthsTectonic Relics You dream of fire. A hellfire-forged zone of blazing heat, the Abyssal Depths are believed to be a continuation and adaptation of the Magma Barracks from Risk of Rain. •Aphelian Sanctuary is part of the Survivors of the Void DLC. It is only available if the DLC is enabled when starting a run. Click for more info. Aphelian Sanctuary This content is part of the Survivors of the Void DLC. It is only available if the DLC is enabled when starting a run. Click for more info. Aphelian Sanctuary (Stage 2) Cleansing Center You dream of clarity. • Commencement Moon of Petrichor V You dream of glass and dirt. Large domain located above the shattered breach of Ground Zero You dream of waves, crashing on cliffsides. Spires of earth jut through the fog and unknown avian creatures circle far peaks guarding their broods. • Rallypoint Delta'Contact Light' Survivor Camp You dream of quiet snowfall. Rallypoint Delta is the remains of a makeshift camp constructed by a group of scattered crew members from the UES Contact Light, somewhere in the frigid tundra of Petrichor V. • Scorched AcresWisp Installation You dream of wind, blowing through trees. Large, circular platforms make up the majority of the stage, and embers float through the air. •Siphoned Forest is part of the Survivors of the Void DLC. It is only available if the DLC is enabled when starting a run. Click for more info. Siphoned Forest This content is part of the Survivors of the Void DLC. It is only available if the DLC is enabled when starting a run. Click for more info. Siphoned Forest (Stage 1) Ground Zero You dream of fire and ice. The map is blanketed in a layer of snow, with large trees surrounded by platforms spanning multiple levels. • Siren's CallShip Graveyard You dream of wind. • Sky Meadow Sprite Fields You dream of serenity. • Sulfur Pools is part of the Survivors of the Void DLC. It is only available if the DLC is enabled when starting a run. Click for more info. Sulfur Pools This content is part of the Survivors of the Void DLC. It is only available if the DLC is enabled when starting a run. Click for more info. Sulfur Pools (Stage 3) Pungent Spring You dream of brimstone. Tiered lakes of shallow sulfur pools. Arcing bridges and underground caves connect the map together. • Sundered GroveDormant Locus You dream of violent growth. Ancient flora has risen up to reclaim this once sacred refuge. Mazes of roots and overgrown fungus have twisted the landscape, leaving only ruins. • Titanic PlainsGround Zero You dream of rolling hills. Gigantic stone arches bracket the skyline, while the main play-field overlooks a vast fractured tectonic lowland. • Wetland AspectRehabilitation Zone You dream of twisting roots. Full of ruined stone structures and swampy areas filled with water. |
| Hidden Realms |
| A Moment, Fractured Hidden Realm: A Moment, Fractured Multiple floating islands in a void, with sharp blue crystals embedded in them. The Obelisk can be found on top of the last island. • A Moment, Whole Hidden Realm: A Moment, Whole A bleak and desolate realm. The refuge of the Mithrix King of Nothing HP: 1000 (+300 per level) Damage: 16 (+3.2 per level) Class: Melee / Ranged Speed: 15 m/s Armor: 20 vengeance and destruction. • Bazaar Between Time Hidden Realm: Bazaar Between Time This stage serves as the shop in Risk of Rain 2. Players can purchase various Items with Lunar Coins or exchange items for higher-rarity ones in two crucibles. • Bulwark's Ambry Hidden Realm: Bulwark's Ambry The area consists of block-shaped platforms, with the Artifact Reliquary in the center. • Gilded Coast Hidden Realm: Gilded Coast You dream of wealth. This area is where the player fights the boss Aurelionite, the Titanic Goldweaver. •The Planetarium is part of the Survivors of the Void DLC. It is only available if the DLC is enabled when starting a run. Click for more info. The Planetarium This content is part of the Survivors of the Void DLC. It is only available if the DLC is enabled when starting a run. Click for more info. The Planetarium (Final) Cell V The Planetarium is an area somewhere within the Void, housing a collection of planets detained by the Void's denizens. It is inhabited primarily by the Voidling, the guard of the Planetarium or potentially the controller of the Void itself. • Void Fields Cosmic Prison Hidden Realm accessible only through the Bazaar Between Time. Until the cell is stabilized, the Void Fields will constantly "suffocate" the player for a small percentage of their current health. • Void Locus is part of the Survivors of the Void DLC. It is only available if the DLC is enabled when starting a run. Click for more info. Void Locus This content is part of the Survivors of the Void DLC. It is only available if the DLC is enabled when starting a run. Click for more info. Void Locus (Hidden Realm) Cell IIIVIIIIIILVIIIVLVILIVLLLVVVILIVLI You dream of potential. The Void Locus contains many Void Potentials and Cradles in place of chests, and is inhabited by Void monsters. |
| Expansions |
| This content is part of the Survivors of the Void DLC. It is only available if the DLC is enabled when starting a run. Click for more info. Survivors of the Void |
| Alternate Game Modes |
| Eclipse • Prismatic Trials • This content is part of the Survivors of the Void DLC. It is only available if the DLC is enabled when starting a run. Click for more info. Simulacrum |
| Mechanics |
| Armor • Damage • Directors • Family Events • Gold • Health • Item Stacking • Lunar Coins • Movement Speed • Proc Coefficient |
| Other |
| Developer Console • Development Team • Languages • Modding • Soundtrack • Unreleased Items • Version History |
Source: https://riskofrain2.fandom.com/wiki/Mithrix
0 Response to "Risk of Rain 2 Cant Hit Continue"
Post a Comment